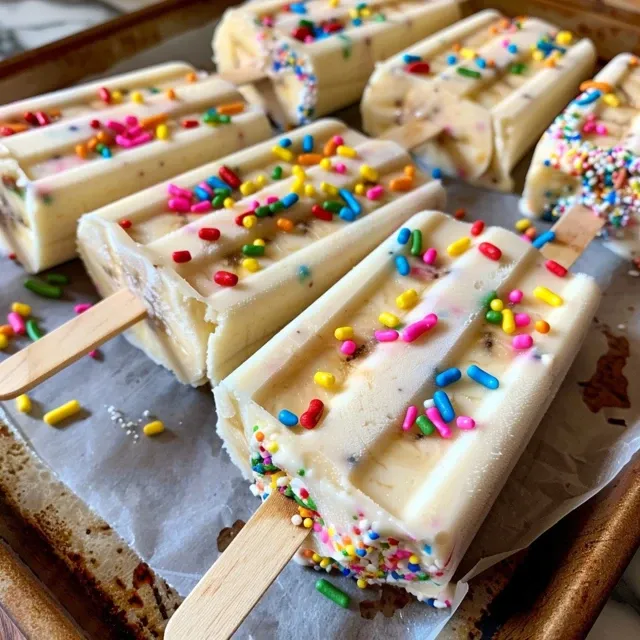
Summer days are perfect for indulging in cool, refreshing treats, and what could be more delightful than homemade frozen banana yogurt pops? With just three simple ingredients, you can create a frozen snack that not only tastes amazing but also brings a smile to your kids’ faces. In this guide, we’ll walk you through everything you need to know to whip up these delicious frozen treats, ensuring every step of the process is as enjoyable as the pops themselves!
Why You’ll Love This Recipe
These Frozen Banana Yogurt Pops are not just another treat; they’re a wholesome delight packed with flavor and nutrition. Here are just a few reasons why you’ll absolutely love this recipe:
- Quick and Easy: Ready in just a few minutes, these pops are perfect for busy parents looking for a quick snack option.
- Healthy Ingredients: Made with bananas and Greek yogurt, these pops provide a nutritious alternative to sugary store-bought treats.
- Customizable Toppings: From sprinkles to nuts, you can tailor these pops to your family’s taste preferences.
- Fun for the Kids: Get your little ones involved in the kitchen! They’ll love dipping and decorating their own pops.
- Perfect for Any Occasion: Whether it’s a hot summer day, a birthday party, or just a fun afternoon snack, these pops fit right in!
Detailed Ingredient Breakdown
Let’s dive into the ingredients you’ll need to create these tasty treats, along with some helpful substitutions:
- Bananas: Use ripe bananas for the best flavor and sweetness. You can also try frozen bananas for a creamier texture.
- Greek Yogurt: Vanilla Greek yogurt is recommended for a sweet and creamy pop. Alternatives include dairy-free yogurts or flavored varieties like strawberry or blueberry.
- Toppings: Get creative! Options include crushed nuts, mini chocolate chips, shredded coconut, or colorful cake sprinkles. You’re only limited by your imagination!
- Popsicle Sticks: These are essential for easy handling and eating. Wooden or reusable silicone sticks work great!
- Parchment Paper: A must-have for lining your baking sheet, preventing the pops from sticking.
Step-by-Step Instructions
Making these Frozen Banana Yogurt Pops is a breeze. Here’s how to do it:
- Line a baking sheet with parchment paper.
- Cut the bananas in half and peel them.
- Insert a popsicle stick into the center of each banana half.
- Dip the bananas into the Greek yogurt, using a butter knife to help coat them evenly.
- Sprinkle your choice of toppings over the yogurt-coated bananas.
- Place the pops on the lined baking sheet and freeze for about 2 hours.
- Once frozen, transfer them to a freezer-safe bag or container for easy storage until you’re ready to enjoy!
Pro Tips for Best Results
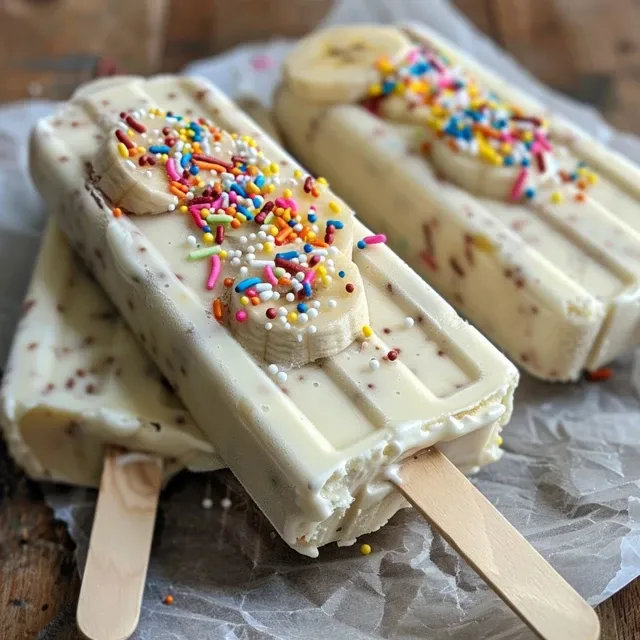
Want to take your frozen banana yogurt pops to the next level? Check out these expert insights:
- Choose the Right Bananas: Look for bananas that are just ripe. Overripe bananas can be too mushy, while underripe ones won’t have the best flavor.
- Experiment with Yogurt Flavors: Don’t be afraid to mix it up! Try different yogurt flavors like honey or berry for a unique twist.
- Keep It Clean: Use a knife or spatula to spread the yogurt evenly, ensuring each banana is well-coated.
- Layer Your Pops: For a fun effect, layer different flavors of yogurt or toppings when coating the bananas.
- Freeze Properly: Make sure the pops are spaced apart on the baking sheet to prevent them from sticking together.
- Thaw Slightly Before Eating: Let the pops sit at room temperature for a minute or two for easier chewing.
- Make Ahead: These pops can be made days in advance and stored in the freezer for a quick, cool snack anytime.
- Don’t Skip the Toppings: The right toppings can elevate your pops from good to spectacular!
Common Mistakes and Troubleshooting
Even the best cooks can make mistakes! Here are some common pitfalls and how to avoid them:
- Pops Not Freezing: Ensure your freezer is at the correct temperature and leave the pops for at least 2 hours.
- Toppings Falling Off: Press the toppings into the yogurt before freezing to help them stick better.
- Bananapops Sticking to the Sheet: Make sure to line your baking sheet with parchment paper to prevent sticking.
- Uneven Coating: Use a generous amount of yogurt, and consider double-dipping for an extra thick layer.
Variations to Try
Feel like shaking things up? Here are some fun variations you can experiment with:
- Chocolate-Dipped Pops: After freezing, dip the pops in melted dark or milk chocolate for a decadent treat.
- Fruit Swirl Pops: Blend berries into the yogurt for a fruity twist that adds flavor and color.
- Nut Butter Pops: Spread a layer of almond or peanut butter before dipping in yogurt for added richness.
- Layered Pops: Alternate layers of yogurt and fruit in molds for a stunning presentation.
Storage and Make-Ahead Instructions
These Frozen Banana Yogurt Pops are perfect for prepping ahead of time:
- Freezing: Store the pops in a single layer in a freezer-safe container or bag for up to 2 months.
- Defrosting: When ready to enjoy, simply pull a pop from the freezer and let it sit for a minute to soften before eating.
Nutritional Insights and Dietary Adaptations
These pops are not just delicious; they’re also a smart choice for health-conscious eaters:
- Low-Calorie Treat: With minimal ingredients, these pops are a guilt-free indulgence.
- Protein Boost: Greek yogurt adds a protein punch, making these pops a satisfying snack.
- Dairy-Free Option: Substitute regular yogurt with coconut or almond milk yogurt to accommodate dietary needs.
Equipment Recommendations
To make your cooking experience smoother, here are a few tools you might need:
- Blender: For making yogurt blends or fruit purees.
- Popsicle Molds: If you prefer a more traditional popsicle shape, invest in molds for easy freezing and serving.
- Spatula or Butter Knife: Essential for evenly coating the bananas with yogurt.
Serving Suggestions
These frozen treats can be enjoyed in various ways:
- Snack Time: Perfect as an after-school snack for kids.
- Party Treat: Serve at birthday parties or summer gatherings for a fun dessert option.
- With Breakfast: Pair a banana yogurt pop with your morning smoothie for a cool breakfast twist.
Frequently Asked Questions
Got questions? We’ve got answers! Here are some common queries about Frozen Banana Yogurt Pops:
- Can I use flavored yogurt?: Absolutely! Flavored yogurt can add a fun twist to your pops.
- How long do they last in the freezer?: These pops can last up to 2 months when stored properly.
- Can I make them dairy-free?: Yes! Use a dairy-free yogurt alternative to make a delicious dairy-free version.
- What if my pops stick to the baking sheet?: Ensure you use parchment paper or freeze them in molds to prevent sticking.
- Can I add protein powder?: Yes! Mixing in a scoop of protein powder can enhance the nutritional profile.
- Are these suitable for toddlers?: Definitely! Just ensure the bananas are cut small enough for little hands.
- What are some topping ideas?: Try mini chocolate chips, granola, or fresh fruit for added flavor and texture.
- Can I make these with other fruits?: Yes! Experiment with other fruits like strawberries or peaches for variety!
With these easy Frozen Banana Yogurt Pops, you’ll have a refreshing treat that’s not only fun to make but also healthy and satisfying. So grab your ingredients, gather the kids, and let’s get popping! Remember, the kitchen is a place for joy and creativity, and with these pops, you can create delicious memories together. Enjoy every bite, and don’t forget to share your creations with us!
Easy Frozen Banana Yogurt Pops
Ingredients
Fruits
- 3 pieces Bananas (cut in half and peeled)
- 1.5 cups Vanilla Greek Yogurt (or yogurt flavor of your choice)
- to taste Cake Sprinkles or crushed nuts (optional toppings)
- 6 pieces Popsicle Sticks
- as needed Parchment Paper
Instructions
- Line a baking sheet with parchment paper.
- Insert a popsicle stick into the center of each banana half.
- Dip bananas into yogurt, covering completely, then sprinkle with toppings.
- Place the decorated bananas on the prepared baking sheet.
- Freeze until solid, about 2 hours. Store in a freezer-safe bag if not serving immediately.