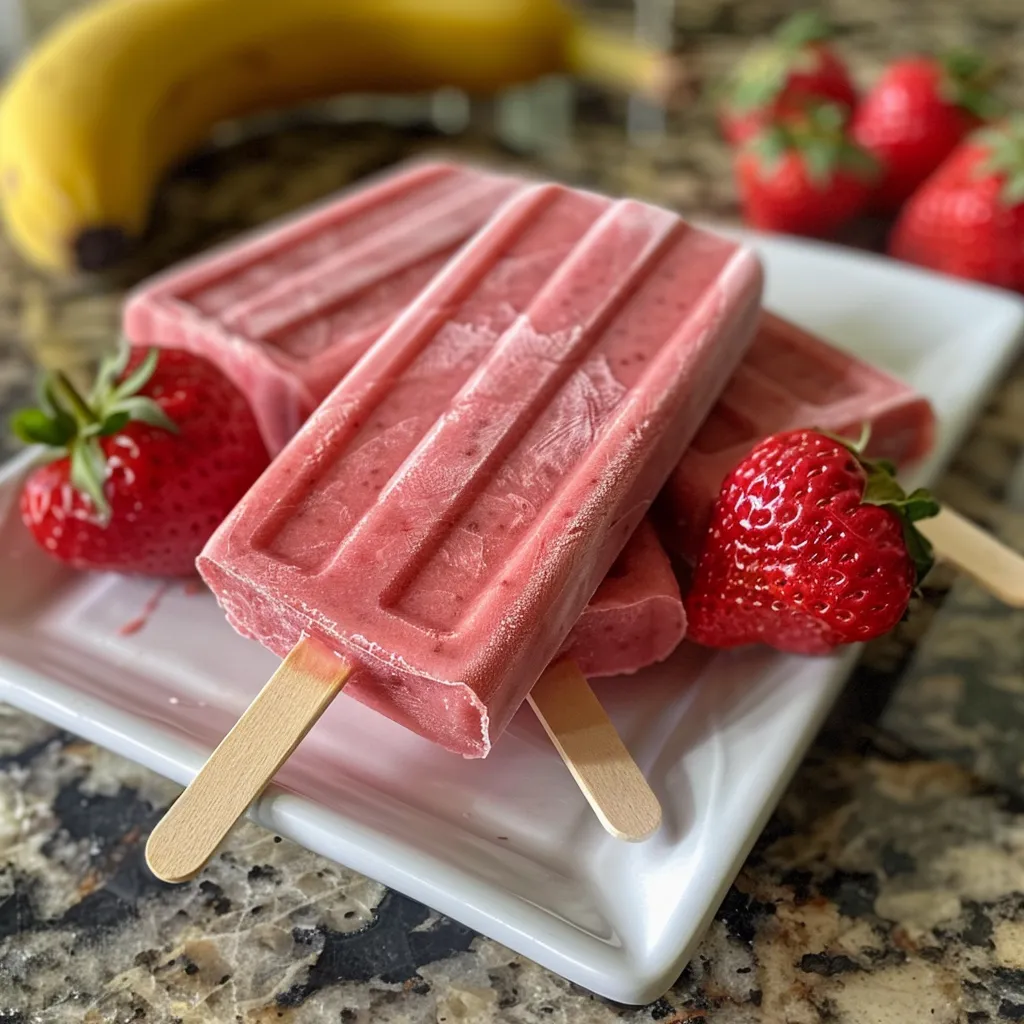
Are you ready to cool down with a refreshing treat that bursts with flavor? Our easy Strawberry Banana Popsicles are made with just a few simple ingredients, perfect for warm days, and delightful for kids and adults alike! In this article, you’ll find everything you need to know to whip up these delicious popsicles, from ingredient breakdowns and pro tips to variations and storage instructions.
Why You’ll Love This Recipe
- Quick and easy: This recipe takes just a few minutes of prep work, making it a fantastic choice for busy days when you want a tasty treat without much fuss.
- Healthier alternative: Made with yogurt and fresh fruits, these pops are a healthier option compared to store-bought ice creams, giving you a guilt-free indulgence.
- Customizable flavors: You can easily tweak the ingredients to create different flavor combinations, letting your creativity shine in the kitchen.
- Perfect summer treat: These popsicles are not just delicious; they’re also a fantastic way to stay cool during hot weather while satisfying your sweet tooth.
- Kid-approved: With a fun, fruity flavor, these pops are sure to be a hit with children, making them an excellent choice for family gatherings and playdates.
Ingredient Breakdown
Let’s dive into the ingredients you’ll need to make these delicious Strawberry Banana Popsicles:
- Yogurt: 1/2 cup (120 ml) – Use any plain or flavored yogurt you enjoy. Greek yogurt adds creaminess and protein!
- Milk: 1/4 cup (60 ml) – Any milk works here! Use dairy or plant-based alternatives like almond or coconut milk.
- Sweetener: 1-2 tablespoons of granulated sugar or honey – Adjust the sweetness to your preference. Maple syrup is also a great alternative.
- Strawberries: 1 cup, hulled and chopped (about 10 medium strawberries) – Fresh is best, but frozen strawberries can work in a pinch.
- Banana: 1 ripe banana, chopped – A ripe banana adds natural sweetness and creaminess to your popsicles.
How to Prepare Your Strawberry Banana Popsicles
Follow these simple steps to create your popsicles:
Step-by-Step Guide
- Place the yogurt, milk, and sugar or honey in a blender. Blend until combined. I like to start with 1 tablespoon of sugar and add more if needed.
- Add the strawberries and banana to the blender. Blend until smooth and creamy.
- Carefully divide the mixture between your popsicle molds. A pitcher can make this much easier!
- Snap on the lids and insert the popsicle sticks.
- Place the molds in the freezer for at least 5 hours, or until fully frozen.
Tips for Success
- Use ripe fruit: Ensure your banana is ripe for the best flavor and sweetness. The bananas should have some brown spots for optimal taste.
- Be patient: Allow the popsicles to freeze completely before trying to remove them. This ensures a smooth release from the molds.
- Warm water trick: If you’re having trouble releasing the popsicles, dip the molds in warm water for a few seconds to loosen them up.
- Experiment: Don’t hesitate to add other fruits or flavors to your mixture, like mangoes or blueberries!
- Portion control: Consider using smaller molds for bite-sized pops that are perfect for little hands.
Variations to Try
Feeling adventurous? Here are some fun variations to consider:
- Mango Madness: Substitute strawberries with ripe mango chunks for a tropical twist.
- Coconut Dream: Use coconut milk instead of regular milk for a creamy, coconut-flavored treat.
- Berry Blast: Combine strawberries with blueberries or raspberries for a mixed berry popsicle.
- Nutty Banana: Add a tablespoon of peanut butter or almond butter for a nutty flavor that pairs perfectly with bananas.
Storage and Make-Ahead Instructions
These popsicles are perfect for meal prep! Here’s how to store them:
- Freezing: Store your popsicles in the freezer for up to 2 months. They’ll stay fresh and delicious!
- Storage containers: Keep popsicles in an airtight container or wrap them individually in plastic wrap to prevent freezer burn.
- Thawing: When you’re ready to enjoy, let them sit at room temperature for a few minutes before trying to pull them out of the mold.
Frequently Asked Questions
Here are some common questions about making Strawberry Banana Popsicles:
- Can I use frozen fruit? Absolutely! Frozen strawberries work well; just let them thaw slightly before blending for a smoother texture.
- How long do popsicles last in the freezer? They can last for up to 2 months if stored properly in airtight containers.
- Can I make these without a mold? Yes! Use small cups or ice cube trays instead, inserting sticks once the mixture is slightly set.
- What’s the best way to sweeten these pops? You can use honey, maple syrup, or your preferred sweetener. Adjust based on your taste preference!
- Can I add veggies to my popsicles? Yes! Spinach or kale can be blended in for extra nutrients; just be aware of the flavor change.
- What if I don’t have yogurt? You can substitute yogurt with extra banana or a bit of cream for a similar texture.
- How do I know when they’re ready? When the popsicles are firm and solid all the way through, they’re ready to enjoy!
- Can I serve these at parties? Definitely! They’re a fun, healthy treat that everyone will love, and you can get creative with different flavors!
Nutritional Information
These Strawberry Banana Popsicles are not only delicious but also packed with nutrients!
- Calories: Approximately 60-80 calories per popsicle, depending on sweeteners and yogurt used.
- Protein: The yogurt adds a good amount of protein, which is great for a satisfying snack.
- Vitamins: Strawberries are rich in vitamin C and antioxidants, while bananas provide potassium and other essential nutrients.
Equipment Recommendations
To make these popsicles, you’ll need:
- Popsicle molds: Choose any size or shape that appeals to you!
- Blender: A strong blender will ensure a smooth mixture.
- Pitcher: For easy pouring into molds.
Serving Suggestions
Serve your popsicles as a refreshing dessert on a hot day. Pair them with:
- Fresh fruit: Serve alongside additional sliced strawberries or bananas for a colorful presentation.
- Yogurt dip: Create a fun yogurt dip for extra creaminess and flavor!
- Granola: Offer a sprinkle of granola on the side for added crunch.
So, there you have it! Making strawberry banana popsicles is a breeze, and with my tips and tricks, you’re sure to create a delightful treat that everyone will adore. Remember, cooking is all about experimenting and having fun, so don’t hesitate to try new flavors and combinations. Happy cooking! 🍓🍌
Strawberry Banana Popsicles
Ingredients
Dairy
- 0.5 cup yogurt
- 0.25 cup milk
- 1 tablespoon granulated sugar or honey (start with 1 tablespoon and add more as needed)
Fruits
- 1 cup strawberries (about 10 medium, hulled and chopped)
- 1 ripe banana banana (chopped)
Instructions
- Combine yogurt, milk, and sugar in a blender and process until smooth.
- Add strawberries and banana, then blend until fully smooth.
- Pour mixture into popsicle molds using a pitcher, insert sticks, and freeze for at least 5 hours.
- To serve, run warm water over the molds for a few seconds and gently remove the popsicles.